
Hello everyone!! I’m back with a little post about how to easily automate the creation of an wireless access point, taking advantage of the portability of a Raspberry Pi Zero W and Docker containers.
You might remember former posts about the topic, like Hiding the Rabbit or the first part of project AIRE (so sorry, those are spanish only!). In both cases we made use of a Raspberry Pi 3, whose wireless interface allowed us to quickly create a highly portable access point using hostapd to create the access point and isc-dhcp-server as a DHCP server.
In this case, we will take our dropbox further and gather the tools inside a Docker container, so tools, dependencies and network configuration are made available quickly and automatically.
I will leave you here the link to the GitLab repository where I have published the project:
https://gitlab.com/hartek/autowlan
Prerrequisites
Given that we will be using a Docker container to manage dependencies and configurations, prerrequisites are few, but still exist.
We must make sure that IPv4 Forwarding is enabled on our operating system, which allows the redirection of packets between different attached networks. In my case, as usual, I use Raspbian on my Raspberry Pi Zero W. In any case, we can check if this feature is enabled on almost any distribution with the command:
sysctl net.ipv4.ip_forward
In case the returned value is 0, we must activate it with:
sysctl net.ipv4.ip_forward=1And in order to make the change persistent, we have to make sure that the following line on /etc/sysctl.conf exists and is not commented out:
# Uncomment the next line to enable packet forwarding for IPv4
net.ipv4.ip_forward=1
In order to avoid problems with dhcpcd service, which in Raspbian and other modern Linux systems is the servicec that manages the network interface autoconfiguration via DHCP, we will add the following line into /etc/dhcpcd.conf, making the service ignore the wireless interfaces wlan0 (but still manage the wired interface eth0):
denyinterfaces wlan0Also, we will obviously have Docker to be installed into our system. We can do this automatically by downloading and executing the official installation script:
curl -sSL https://get.docker.com | sh We will also install docker-compose, a toll that will help us manage containers later, by getting some dependencies and using Pip for the installation of the tool itself:
apt-get install libffi-dev libssl-dev
apt-get install -y python python-pip
pip install docker-compose
At this point, we have met all the requirements to continue our little project 🙂
Image creation and configuration
Once we have installed the former dependencies, we can start to construct our Docker image, from which we will build our containers later. We will create a directory for the project with any name we cant. I will name it autowlan. Inside it, we can create a confs folder that will contain the configuration files that will be put into the image, and then another folder hostapd_confs inside it, with configurations related to the access point service itself.
Dockerfile
To define the Docker image we will create a new file named Dockerfile with the following content:
from arm32v6/alpine

# Install packages
RUN apk update && apk add hostapd iw dhcp vim iptables

# Configure Hostapd (default will be open)
ADD confs/hostapd_confs/open.conf /etc/hostapd/hostapd.conf
# Configure DHCPD
ADD confs/dhcpd.conf /etc/dhcp/dhcpd.conf
RUN touch /var/lib/dhcp/dhcpd.leases

# Configure networking
ADD confs/interfaces /etc/network/interfaces
ADD confs/iptables.sh /iptables.sh
ADD confs/iptables_off.sh /iptables_off.sh

# Copy and execute init file
ADD confs/start.sh /start.sh
CMD ["/bin/sh", "/start.sh"]
Some explanations about it:
- On the first line we inherit from arm32v6/alpine. Why don’t we use the usual Alpine image? Because we are developing our project over a Raspberry Pi Zero W, which processor is an ARMv6, so we need a base image that is compatible with that platform.
- We will update and upgrade the image’s software with apk and install the tools we will be needing: hostapd (the software for the access point), iw (in order to perform some debugging over the wireless interfaces if deemed neccessary), dhcp (contains dhcpd service, which we will use to give IPv4 addresses to clients), vim (to possibly edit files during execution) and iptables (to manage network routing).
- Then we will add the configuration files for hostapd and dhcpd into the image (we will discuss further about this later). By default open.conf will be added as hostapd.conf file.
- We will also add the network configuration files (we will also discuss these later).
- Lastly, we will add an initial script start.sh that will be executed right after container’s boot.
hostapd service – hostapd.conf
This file will be in charge of configuring hostapd, which will create and manage the access point itself. We will create three different files. Why? Because we will be able to manage the image so it can create three different access point configurations.
- A default OPEN access point, without security or authentication. We will have a confs/hosapd_conf/open.conf for this, with the following contents:
interface=wlan0
driver=nl80211
ssid=raspi_open
hw_mode=g
ieee80211n=1
channel=6
auth_algs=1
ignore_broadcast_ssid=0
wpa=0
country_code=ES
macaddr_acl=0- A WEP (Wired Equivalent Protection) protected access point. We can introduce the network’s password on the wep_key0 field. In my case, and just for testing, I will just use 1234567890. We will have a confs/hostapd_confs/wep.conf file with the following contents:
interface=wlan0
driver=nl80211
ssid=raspi_wep
hw_mode=g
ieee80211n=1
channel=6
auth_algs=1
ignore_broadcast_ssid=0
wpa=0
country_code=ES
macaddr_acl=0

wep_default_key=0
wep_key0=1234567890- A WPA2 (Wi-Fi Protected Access 2) protected access point. In the wpa_passphrase field we will be able to configure the network’s password. In my case, and again just for testing, I will just use password. We will have a confs/hostapd_confs/wpa2.conf file with the following contents:
interface=wlan0
driver=nl80211
ssid=raspi_wpa2
hw_mode=g
ieee80211n=1
channel=6
auth_algs=1
ignore_broadcast_ssid=0
wpa=2
country_code=ES
macaddr_acl=0

wpa_passphrase=password
wpa_key_mgmt=WPA-PSK
wpa_pairwise=CCMP
rsn_pairwise=CCMP
You can find here a good explanation of the configuration fields. I will just point out that the SSID of the created network will use the ssid field on the configuration files, and the security is defined especifically on each one of them, as you may have noticed.
DHCP service – dhcpd.conf
On this file we will find the configuration fields necessary to create a DHCP service that will allow us grant IPv4 addresses to our clients. This configuration will be read by dhcpd service that we installed on the image through the Dockerfile.
authoritative;
subnet 11.0.0.0 netmask 255.255.255.0 {
        range 11.0.0.10 11.0.0.20;
        option broadcast-address 11.0.0.255;
        option routers 11.0.0.1;
        default-lease-time 600;
        max-lease-time 7200;
        option domain-name "local";
        option domain-name-servers 8.8.8.8;
}
You can find here a further explanation of the former fields, but in essence, we set ourselves as the main DHCP server on the network with authoritative and define an 11.0.0.0/24 network on which range we will grant up to 10 client addresses.
Newtork configuration – interfaces
As we saw when creating Dockerfile, a file named interfaces is added into the image on /etc/network/interfaces, which will contain the network configuration of the access point created over the wlan0 interface.
Its contents will be:
auto wlan0
iface wlan0 inet static
        address 11.0.0.1
        netmask 255.255.255.0

auto eth0
iface eth0 inet dhcp
As you can see, the wlan0 interface on which we will run our access point will have a static IPv4 address of 11.0.0.1/24. Also, it is specified that the eth0 interface will be configured via DHCP when it connects into our external gateway, through which we will access the Internet. We configured /etc/dhcpcd.conf on the host system some sections before and there should not be any annoying network service on the Alpine base image, but it is better to prevent possible issues.
Network configuration – iptables.sh and iptables_off.sh
On these two configuration files we will define the IpTables rules through which we will create a NAT or Network Address Translation to allow the transparent communication between our access point’s network and the outside. In our case, the NAT will be created between wlan0 and eth0 interfaces, the second serving Internet connection into the first.
The iptables.sh script contains the rules requried to establish this NAT and has these contents:
#/bin/sh
iptables-nft -t nat -C POSTROUTING -o eth0 -j MASQUERADE || iptables-nft -t nat -A POSTROUTING -o eth0 -j MASQUERADE
iptables-nft -C FORWARD -i eth0 -o wlan0 -m state --state RELATED,ESTABLISHED -j ACCEPT || iptables-nft -A FORWARD -i eth0 -o wlan0 -m state --state RELATED,ESTABLISHED -j ACCEPT
iptables-nft -C FORWARD -i wlan0 -o eth0 -j ACCEPT || iptables-nft -A FORWARD -i wlan0 -o eth0 -j ACCEPT
On each line, we use the bash logical operator || (OR). By this, we declare that for each line the first command (the one on the left of the operator) will be executed. If the command exits successfully (return code 0) the second command (the one on the right of the operator) won’t be executed. In case it returns an error (return code 1), the second command will be executed.
On each line, the first command is iptables-nft, which is used on Alpine to manage the new Firewall system on Linux, based on nftables, but still using the classic IpTables rule syntax (on Debian, Raspbian and other distros the iptables command actually links iptables-nft by default). It looks for a rule (-C) on the current applied ruleset. If the rule does not exist, the check command will return a value 1 (error), and hence the second command will be executed, which actually adds (-A) the rule. This will prevent rules to be applied twice.
As for the rules themselves:
- The first will create a rule on POSTROUTING chain and nat table over eth0 interface, creating by this a Masquerade type NAT (this changes the original IP for the one defined on eth0 on the outbound network packets).
- The second rule allows the redirection of the network packets from eth0 interface towards wlan0 interface as long as they are related to an already established connection (RELATED,ESTABLISHED).
- The third rule allows the redirection of the network packets from wlan0 interface towards eth0 interface in any case, allowing by this the opening of new outobound connections.
Now, in the case of iptables_off.sh script, it has the following contents:
#/bin/sh
iptables-nft -t nat -C POSTROUTING -o eth0 -j MASQUERADE && iptables-nft -t nat -D POSTROUTING -o eth0 -j MASQUERADE
iptables-nft -C FORWARD -i eth0 -o wlan0 -m state --state RELATED,ESTABLISHED -j ACCEPT && iptables-nft -D FORWARD -i eth0 -o wlan0 -m state --state RELATED,ESTABLISHED -j ACCEPT
iptables-nft -C FORWARD -i wlan0 -o eth0 -j ACCEPT && iptables-nft -D FORWARD -i wlan0 -o eth0 -j ACCEPT
You may notice that the content is almost the same except for two details. The first is the substitution of the || (OR) operator for the && (AND) operator. With this, the second command on each line will be executed only if the first one does successfully exit, that is to say, if the rule does exist and hence must be dropped by the script. The second detail is that instead of adding the rules we will be, then, deleting it by using -D.
Initial script – start.sh
Lastly, we have a initial script called start.sh that will be the entry point for the container execution and on which we will see how all the services are executed. It has these contents:
#!/bin/sh

NOCOLOR='\033[0m'
RED='\033[0;31m'
CYAN='\033[0;36m'
GREEN='\033[0;32m'

sigterm_handler () {
  echo -e "${CYAN}[*] Caught SIGTERM/SIGINT!${NOCOLOR}"
  pkill hostapd
  cleanup
  exit 0
}
cleanup () {
  echo -e "${CYAN}[*] Deleting iptables rules...${NOCOLOR}"
  sh /iptables_off.sh || echo -e "${RED}[-] Error deleting iptables rules${NOCOLOR}"
  echo -e "${CYAN}[*] Restarting network interface...${NOCOLOR}"
  ifdown wlan0
  ifup wlan0
  echo -e "${GREEN}[+] Successfully exited, byebye! ${NOCOLOR}"
}

trap 'sigterm_handler' TERM INT
echo -e "${CYAN}[*] Creating iptables rules${NOCOLOR}"
sh /iptables.sh || echo -e "${RED}[-] Error creating iptables rules${NOCOLOR}"

echo -e "${CYAN}[*] Setting wlan0 settings${NOCOLOR}"
ifdown wlan0
ifup wlan0

echo -e "${CYAN}[+] Configuration successful! Services will start now${NOCOLOR}"
dhcpd -4 -f -d wlan0 &
hostapd /etc/hostapd/hostapd.conf &
pid=$!
wait $pid

cleanup
This is somewhat more complex 🙂
- In first place, we will find some ANSI color code declarations in order to have a more colorful output and make it more visually intuitive.
- We can se a defined sigterm_handler function which we will use to catch SIGTERM and SIGINT signals that the script might received by sending a keyboard interruption on interactive mode (CTRL+C) or by stopping the container via docker stop. The funcion will gracefully stop the executing hostapd service and will execute the cleaup function that we will now describe.
- Some lines later we can see how the function is set to trap those signals.
trap 'sigterm_handler' TERM INT- Then a cleanup function is declared to bring back the host system into normal state. Given that the container works with the NET_ADMIN capability, its network changes is directly reflected on the host system, and we will want to revert those changes on termination. These changes to revert are the insertaed IpTables rultes, which will be dropped using iptables_off.sh script, and the state of wlan0, which might end up in an unexpected state, so we will put it down and up again with ifdown and ifup.
- You can see that this function is executed at the end of the script and also when it receives a termination signal (SIGTERM/SIGINT) and executes sigterm_handler.
- After declaring the signal trap with sigterm_handler we execute the iptables.sh script in order to create the network rules, and using ifdown and ifup we reconfigure wlan0 with the local /etc/network/interfaces file copied on the container.
- Lastly, it executes the services themselves.
- The dhcpd service is executed with parameters -4 -f -d wlan0, indicating that IPv4 addresses will be used, it is executed on the foreground (so the logs are shown) and we put the logs into stderr, being executed explicitely on wlan0. Also we can see the & character in the end, making it execute in the background. This might seem to contradict -f parameter, but the result is that even in the background we will be able to see the logs on screen.
- The hostapd service is executed, also in the background making use of &, reading the configuration stored on /etc/hostapd/hostapd.con. As we saw on the Dockerfile, the OPEN network configuration is there by default. In the next section we will see how to use different configurations using a bind mount.
- In the end, the script stores the PID of hostapd process and waits until it is finished. If hosapd fails in any moment and ends execution, the cleanup funcion in the end will always allow the host to be rolled back into its original network configuration.
Building the image with docker build
Having finished our tour through the various configuration files, we have everything set to create our image. We can do this by placing ourselvs on the project’s folder and executing:
docker build . --tag autowlanWith this, the image creation is initiated. The image will be tagged with a name, autowlan, easing its later identification.
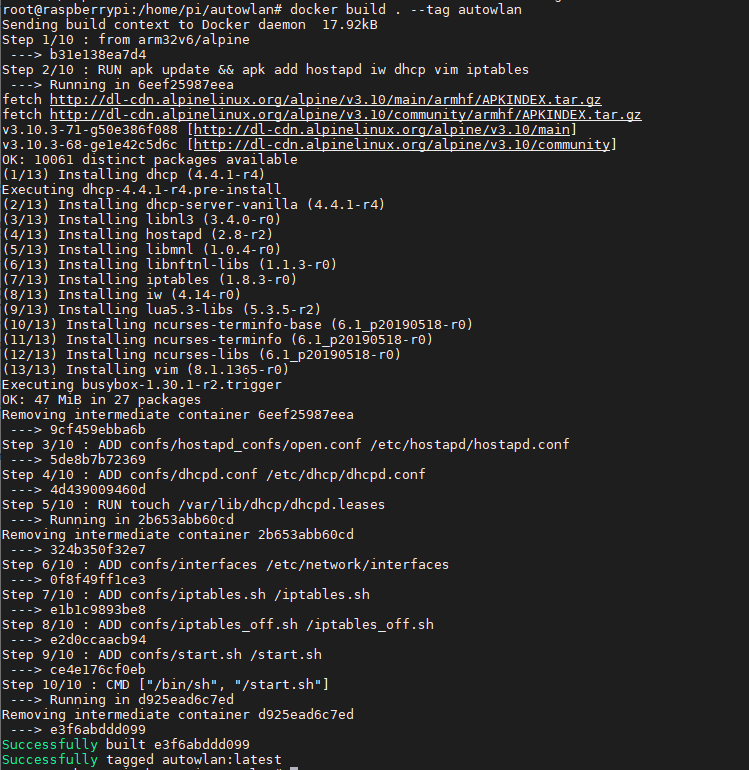
We will see how the base Alpine image is downloaded, tools are installed into the image and configuration files are copied into it (unless, as in my case and in order to save some space here, the first steps are taken from cache). It is a Raspberry Pi Zero W; give it some time to finish! 🙂
Creation and execution of the container
We are nearly there! We can launch the container from the created image with the command:
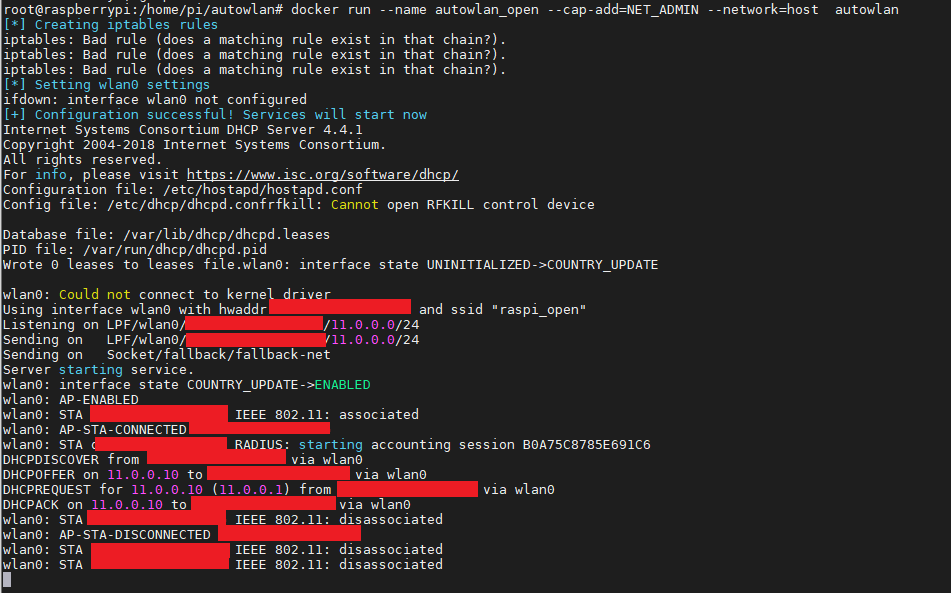
docker run --name autowlan_open --cap-add=NET_ADMIN --network=host autowlanA small explanation of the command parameters:
- –name allows us to create the container with a specific name, making the management easier.
- –cap-add=NET_ADMIN will add a Linux system capability to the container, called NET_ADMIN, which will allow it to manage the network configuration of the host machine. This is necessary in order to create the IpTables rules for the access point.
- –network=host makes the container use the host’s network, making use of its interfaces and IP addresses transparently.
- autowlan is the name of the formerly created image.
We can see how the container and services are created, showing the log lines of both hostapd and dhcpd as well as colored lines about the container’s execution process, which we wrote inside start.sh. Aditionally, we can see how a newtork device has joined the network (censored! :P), how a 11.0.0.10/24 IPv4 address has been offered and granted to it and, lastly, how the device disconnects.
If we wanted to create and boot the container in the background, we can add the -i parameter to docker run.
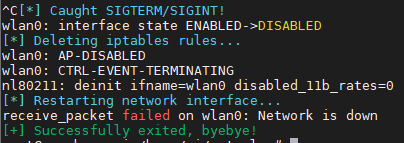
We can stop the container with a keyboard interruption (CTRL+C) to see how the services stop and the network configuration on the host is reverted back to normal, showing a final success message in the end. If it were executing in the background, we may stop the container with the command docker stop autowlan_open.
If we wanted to start the container again, we would only have to execute docker start -i autowlan_open in order to initiate it, since the container has been already created by the former docker run command. If we wanted to start it on the background, we can omit the -i parameter.
WEP and WPA2 configurations
You will remember that, although by default the autowlan image already contains the necessary configuration to create an open access point, we have created additional configuration files in the confs/hostapd_confs directory with WEP and WPA security settings.
We can make use of them when creating the container with docker run by adding a bind mount to the command, mounting one of those configuration files in /etc/hostapd/hostapd.conf inside the container. This will cause hostapd to take them as configuration files and create an access point with the given security configuration.
Hence, we can create a container secured with WEP with the command:
docker run --name autowlan_wep --cap-add=NET_ADMIN --network=host -v $(pwd)/confs/hostapd_confs/wep.conf:/etc/hostapd/hostapd.conf autowlanAs you can see, we have changed the name of the container to autowlan_wep to make it descriptive and we have added the parameter -v $(pwd)/confs/hostapd_confs/wep.conf:/etc/hostapd/hostapd.conf, which performs the bind mount of the configuration file wep.conf into the container (the $(pwd) statement is used to create an absolute path).
Similarly, we can create a WPA2 secured container with:
docker run --name autowlan_wpa2 --cap-add=NET_ADMIN --network=host -v $(pwd)/confs/hostapd_confs/wpa2.conf:/etc/hostapd/hostapd.conf autowlanIn both cases the management is done with exactly the same commands as in the previous section, except that we will have to use the name of the container in question.
If we were to execute docker container ls we could see the three created containers, ready to be used.

Container management with docker-compose
Finally, and totally optional, we could make use of the docker-compose tool to create and manage the containers. To do this, we can create three different files to manage the three types of containers we have described.
An open-docker-compose.yml file to manage the container with no security:
version: '3.7'
services:
  wlan:
    container_name: wlan
    build: .
    image: wlan
    cap_add:
      - NET_ADMIN
    stop_grace_period: 2m
    network_mode: "host"
    volumes:
      - ./confs/hostapd_confs/open.conf:/etc/hostapd/hostapd.conf
A wep-docker-compose.yml to manage the container with WEP security:
version: '3.7'
services:
  autowlan:
    container_name: autowlan_wep
    build: .
    image: wlan
    cap_add:
      - NET_ADMIN
    stop_grace_period: 2m
    network_mode: "host"
    volumes:
      - ./confs/hostapd_confs/wep.conf:/etc/hostapd/hostapd.conf
And a wpa2-docker-compose.yml to manage the container with WPA2 security:
version: '3.7'
services:
autowlan:
container_name: autowlan_wpa2
build: .
image: wlan
cap_add:
- NET_ADMIN
stop_grace_period: 2m
network_mode: "host"
volumes:
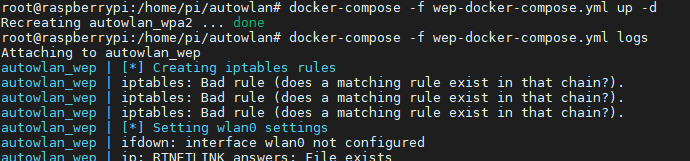
- ./confs/hostapd_confs/wpa2.conf:/etc/hostapd/hostapd.confIn any of the three cases, we can execute docker-compose by reading the configuration files and managing the containers with the following commands:
- docker-compose -f <fichero_yml> up to create and run a container.
- docker-compose -f <fichero_yml> up -d to create and run a container in the background.
- docker-compose -f <fichero_yml> down to stop a container in the background.
- docker-compose -f <fichero_yml> logs to read the logs of a container in the background.

So far so good 🙂 I know this has been quite long, but I hope you liked it and it made you learn something new. Don’t be too bad!!